Author: Ryan MacGregor Page 2 of 3

Activity 7: Generate and Embed a Transcript for an Audio File

I believe inclusion is a vital part of teacher pedagogy, particularly when it comes to student learning. Nell Noddings’ ethics of care construct states that without the security of self, student learning is hampered or even stagnant. She extrapolates that to society as a whole, where the bulk of social issues surrounding crime, addiction, abuse, and the degradation of our social systems are tied to the nurturing (or lack thereof) of the individual. In this podcast, I lay out some of the efforts and rationale that I have implemented in my practice to support my learners, and perhaps even start the conversation towards educational and social reform.

Please click the link below for a transcription of the podcast; note that all time stamps have been removed for ease of  reading.

Transcription to The Importance of Inclusion in Teacher Pedagogy

Assignment 4 – Media Tool Presentation by Ryan MacGregor and Rolly de Juan – PowToon

Media Tool Presentation – PowToon

Written Report:

Please find the attached link to view our written report:

https://drive.google.com/file/d/1ACzfdXIBsKeE-3Fe3QhlQ_tjb5Lm91i4/view?usp=sharing

Blog (with discussion questions):

Powtoon- A Pedagogical Critique

By Rolly De Juan & Ryan MacGregor

Powtoon is an online multimedia editor similar to Powerpoint. Its strength lies in the ease of collaboration, as it moves between most social media platforms such as Youtube, Instagram, Vimeo, and Facebook. The product is highly engaging, and easily created with a large library of images and avatars that animate quickly and fluidly. It contains an edit toggle that can keep things simple for new users, or unlock full manipulability for the experienced learner. Powtoon is examined using four lenses; Ease of Use, Pedagogy, Accessibility, and Universal Design for Learning (UDL).

Ease of Use

Powtoon Ease Of Use
The Pros The Cons
  • Object interactions run similarly to Powerpoint or Prezi, so experience transfers
  • Edit objects with ease
  • Create video in app
  • Fluid animation sequences
  • Two modes for novice and power-users
  • Easy to use templates
  • Quick to generate polished product
  • Point and click makes it hard to find menu items
  • Add-ons are expensive
  • Lots going- can be distracting
  • Potential steep learning curve for emergent users
  • Requires internet access, bandwidth, and computer that can run software well


Pedagogy and Powtoon

  • Constructivist; learners make sense of their knowledge, creating their output with autonomy. Creates a very large and flexible growth field for knowledge extensions, as users find their own limits.
  • Skills learned with the software become transferable to similar software.
  • Can be shared across multiple media platforms for collaborative projects, and to engage community.

Accessibility

Follows the ‘POUR” acronym.

  • Perceivable – provides the “wow” factor that enables the web-based message to be clear and memorable (Graham and Spitalnik, 2015) by taking information to make it work for them through sight, sound, and touch.
  • Operable – relatively easy to navigate through the content.  Fonts, text size, speed of presentation, and color schemes can all be adjusted and adapted.
  • Understandable – website support, webinars, and tutorials are available.  Captions can be enabled.
  • Robust – easily navigable and adjustable for use on devices including laptops, cell phones, tablets, and multiple web browsers.
  • Represents minorities and differing abilities in image library
  • Full version is cost prohibitive.

UDL friendly

In project- based learning,  five key elements can be evaluated including:

  •  Inquiry – allows students to review the features and benefits of the tool.  PowToon has user support from the website and blogs.
  • Research – allows students a blank slate to display research about their respective subject matter, and compile the information to generate a cohesive presentation.
  • Collaboration – students can collaborate with others on group presentations.  Animated characters can represent unique parts.
  • Presentation – the presentation itself will require time to perform edits with frames, timing, sound, and images to make a comprehensive presentation.
  • Reflection is difficult, and generally must come from external sources. In the case of Powtoon, there are discussion forums, and instructor feedback to continue the conversation.

Some food for thought as an extension to this critique:

How would you assure and assess a quality product from learners using Powtoon?

How can you use PowToon in your educational context and what type of presentations can you create for your learners?

What do you feel is the best approach to supporting students learning of the software- exploratory (where they trial-and-error their way through) or explanatory (where you assist them over the learning curve), and why?

Additionally, all questions and comments are welcomed. If you have had experience with Powtoon, please feel free to share it.

Assignment 2: Develop an Online Media Assignment

Assignment 2: Develop an Online Media Assignment

In this exercise, students will create a radio advertisement based off a short article and related questions. This particular project is aimed at a fourth and fifth grade class, as part of a Language Arts program.

The learning outcome being evaluated here is that the students will be able to incorporate the contextual vocabulary featured in the article into a series of sentences (paragraph) using appropriate conventions (spelling, capitals, and sentence structure).

The unit that this radio project is derived from a set of comprehension questions that follow a three-paragraph article on the Mexican dish, mole. Students are asked to pretend that they are the cook, and explain (in writing) how the shopping for, and preparing of, mole is complex.

On the next assignment, students are asked to create an advertisement for a new Mexican restaurant promoting their opening and authentic dishes including chicken and mole sauce. The target audiences for the assignment are local businesses and individuals, and criteria of what to include in the ad is provided. The previous writing assignment will act as a script for the recording.

Having students create a media project as a culminating activity makes a lot of sense. It allows them to continue to develop facility with technology, synthesize their reading comprehension and sentence structure, and, in this case, “Identify how differences in context, perspectives, and voice influence meaning in texts” (BC’s Curriculum, n.d.). Criteria to be assessed is: sentence structure, use of contextual vocabulary, vocal expression and performance, use of technology. Specifically, sentence structure assesses proper sentence form (subject/predicate, verb agreement, and sequencing); the use of contextual vocabulary assesses the integration and correct usage of supplied vocabulary; vocal expression and performance assesses diction, pacing and expression in reading; use of technology assesses quality of audio (is it audible) and use of audio effects (addition of music and effect to attract attention). In addition to the aforementioned BC curricular competency this formative assessment also aligns with the BC curriculum’s competencies for students to:

  • Consider different purposes, audiences, and perspectives in exploring texts
  • Synthesize ideas from a variety of sources to build understanding
  • Use a variety of comprehension strategies before, during, and after reading, listening, or viewing to guide inquiry and deepen understanding of text

References

British Columbia Ministry of Education. (2021). English Language Arts 5. Retrieved from the Government of British Columbia website: https://curriculum.gov.bc.ca/curriculum/english-language-arts/5/core


Creating a Radio Advertisement

[Student Assignment Page]

Now we are going to record the advertisement we created from the last assignment. Using QuickTime, record your advertisement (if you need a reminder, there are how-to links below.). You are trying to get people and businesses from the community to come and try your brand-new Mexican restaurant. Remember to use the vocabulary listed on page 18 to add detail to your ad when you are writing it. Make it try to sound like a real radio broadcast! You will be marked on your message, how you deliver it, and how you use the technology. Please review the rubric before you start so you can begin with the end in mind.

You will need to make up a name and an address for your restaurant and use an expressive (radio) voice when you are reading. People will be excited if you are! Please add some music that suits your restaurant; you can find lots of free music on the internet (try going to this site). You will need to download your music to your computer, just like we practiced in class. If you need a reminder on bringing music into your project, there are how-to links below. A tip: Spanish music is well-known for a style called flamenco.

Helpful Links

How to record your advertisement in QuickTime

How to import your background music into Audacity

How to add sound effects into Audacity

How to add audio effects to some or all of your project


Supporting Documents

A link to the supporting article for the radio advertisement project

The PDF of the supporting article and vocabulary for the radio project


Eddying…I Mean, Editing an Audio File

I had a lot of fun with this! The biggest issue was trying not to get sucked in to playing with audio settings too much (I have a lot on the go right now, and must manage my time very conservatively). I recorded using my Steinberg C11, and ran that through an amp simulator in Garageband. I finished it in Audacity, where I removed a couple of pops and tightened up the dead space at the beginning of the track. I realized after the fact that though I recorded in 96000 kHz through Garageband, you can still hear the 60-cycle hum overlay from the amp simulator. I thought that was pretty cool…very authentic to the time and style. I had to restrain myself from doing multiple takes when it didn’t sound just right, or doing ‘punch-ins’, where a portion of audio track is replaced by an overlay.
Please note there is a 20 second delay before audio inputs are audible.

I had already edited the file before posting, so I thought I would put the original up. I left the click track (or metronome, if you prefer on in the background, which is very distracting with its little digital blip every quarter beat. Here’s what the unedited version sounded like.

For the final version, I tweaked a graphic equalizer to scoop the mids, then isolated and split a lead vocal track (very copyright, but this is not for commercial distribution) into two different tracks, and placed vocal ad-libs at interval. I also shortened the dead space at the beginning to 10 seconds, removed a small click at head of the guitar track,and added a fade-out to the final notes of the guitar, leaving the vocals at volume. Lastly, I put the noise reduction filter over with very low sensitivity to preserve the original amp simulation.

Addendum: The Importance of Inclusion in Teacher Pedagogy

This combined audio file took a lot more work because I had an audible hum from a short in my microphone that I could not remove to my satisfaction. After I re-recorded the segment and punched it in to the main audio track, I had to play with the EQ to match the levels and different microphone inputs. I also played with swelling in and fading out audio tracks, and had to paste the same track over and blend it a couple of times so that it filled my audio track timeline. When I created this, I definitely saw this as a podcast for teachers; I really enjoyed it, and that may be something I pursue in the future when I have more time to generate content.

Sourcing Creative Commons Audio for Educational Use

Learning outcome:
Students will be able to physically show and name the parts of the body in English and French featured in the song. Parts are:
• le doigt- finger
• les mains- hands
• le nez- nose
• le coude- elbow
• le pied- foot
I was able to find a number of musical renditions of this traditional French folk song through multiple Creative Commons and royalty-free archives (I found this compilation of CC sites- https://www.hongkiat.com/blog/creative-common-music-download/), and chose two versions. The first is an audio recording located through the Library of Congress. I also found this video (https://www.youtube.com/watch?v=kBG-RnZU2cQ) that shows how to filter through Youtube searches, and this provided a different version of the song, with different language accents. The original version of the song (https://www.loc.gov/item/jukebox-188396/) features a mezzo soprano with a very clean accent, which in turn makes translation easier for the developing second-language ear. The second is more modern, and a cleaner recording without all the ambient audibles which, as noted by Carter (2012), can detract from the focus of the listener; therefore, two versions were provided to both accommodate and give framework that is interchangeable between renditions.
The selection of a song (not song and video) is a fundamental medium for learning a language because it uses melody to provide pattern and context. Songs are used to teach young children concepts and vocabulary because of the predictive nature and patterns contained in melody. This associates strongly with the personal narrative format which “actively involve[s] the listener in the material provided” (Carter, 2012, p. 5). Another aspect of using the song as medium aids the retention of the ‘big idea’ of the sentence. As Carter noted,” sentences need to be presented in a way that allows the user to interpret and process the material that was being presented without trying to remember how the sentence started out”; using a repetitive structure such as a refrain in a song creates an aural pattern that triggers recall.
Rather than edit this video for audio quality, I provided two versions from different eras; the first version references and demonstrates culture and longevity of song and language as knowledge transmitters, which is an important lesson in and of itself. Second, it becomes a minor contextualized lesson on technology, and the importance and relevance of historical preservation when examining the style, linguistic structure, and dialectical evolution. Had there not been this option, I would edit the initial piece for volume equalization, and to eliminate any ambient microphone ‘colour’.

Savez-Vous Plantez des Choux, circa 1918

Savez-Vous Plantez des Choux, 2012

References

Carter, C. W. (2012, October 26). Instructional audio guidelines: Four design principles to consider for every instructional audio design effort. Techtrends: Linking Research & Practice to Improve Learning, 56(6), 54–58. https://doi.org/10.1007/s11528-012-0615-z

de Planoise, T. [Toufik de Planoise]. (2012, November 2). Buffalo Grill, animations anniversaire : savez-vous planter les choux ? (7) [Video]. Youtube. https://www.youtube.com/watch?v=zZH7iF4TtWQ

Gauthier, E. (n.d.). Savez-vous planter les choux? Retrieved March 03, 2021, from https://www.loc.gov/item/jukebox-188396/ Originally published 1919-06-21

Designing a Student Media Project Outline

Examining and constructing learning outcome for a French biography project.

By completion of this assignment, students, in accordance with BC curriculum, will be able to show use of common, high-frequency vocabulary and sentence structures for communicating meaning by showing they can:

  • ask a variety of questions
  • give descriptions of others
  • express likes, dislikes, and preferences

L’Ami(e)- Une Biographie

This project matches with provincial outcomes for grade 6 and grade 7 (French as a second language). Students interview each other with questions, and use written and oral language. The completed project will show students’ use and understanding of basic questions and answers; physical descriptions; likes, dislike, and preferences; and simple vocabulary such as parts of the body and colours.

Students will start with a randomly selected partner is class. They will look at exemplars of a biography, talk about it bth as individuals, and as a  class. They will generate a list of interview questions in French, and talk about it in a large group. Finally, each partner will generate their own questions.The quality, and to a lesser degree, quantity of the questions will count on the final assessment.

Final biographies can be submitted in a variety of formats such as a wiki, movie, or essay. All projects are composed in French, using the correct conjugation and vocabulary, which will contribute towards the final assessment.

Processes and Procedures

Stage 1- Team up and brainstorming

Stage 2- Generating framework

Stage 3- Interviewing

Stage 4- Synthesis of Material

Stage 5- Reviewing the product

Team or individual responsibility

As a team, generate the list of information necessary for a biography, and compile a question list. As individuals, generate your supplementary questions, conduct your interviews, complete periodic self and group assessments, and create your final product for grading. Below is a rough timeline for milestone completion dates.

Week 1 Week 2 Week 3 Week 4 Week 5
Step 1/2  Step 3 Step 4 Step 4 Step 5


Sourcing a Piece of Media

*When media is created on the H5P site, the exporting process is inadequate, and provides embedding codes and html links, none of which seem to work here. For the purposes of having this project, I have included a URL linking to the interactive video.

Thumbnail featuring apples that links to an interactive video

Click to activate the video

Media Used: For this project, I took a number of Creative Commons content from both https://www.videvo.net/ and Free Stock Creative Commons videos on Youtube. The accompanying background music was called Jazz in Paris, a royalty-free piece authorized for replay by Media Rights Productions. The videos were pieced together in iMovie, and uploaded to H5P.com, where the video timeline was paired with the multiple-choice queries to create interactive media.

Topic:
French as a Second Language

three by three grid of different types of commons fruit, with their names written in French underneath

Learning Outcome:
The learning outcome for this lesson is twofold; first, understanding the masculine and feminine associations of words in French, and second, encountering common fruit names in the French language. The vocabulary used here has previously been brainstormed in class to create a list of the most common fruits, so that any unknown items could be explained in greater detail. A sheet has been attached to review the prior knowledge necessary to successfully complete the activity, or to assist students with unique learning needs. (A note: the singular form ‘un/une’ is included regardless of quantity in the pictures so the students make the oral connection between word gender and language usage).
Upon completion of the lesson, students will be able to: Identify at least 4 of the commonly listed fruits.
Learner instructions
Play the accompanying video. When the video pauses, click the hand icon that appears to answer the multiple-choice question. When the question is answered correctly, the video will continue. There are nine questions in all.

Credits
Music: Jazz In Paris – Media Right Productions https://youtu.be/mNLJMTRvyj8

Outlining a Student Graphics Activity

Here’s an example of a class activity generated to support higher-order thinking skills and summative assessment of the digestive system. The grade level is intermediate elementary, and aligns with the BC science curriculum.

____________________________________________________

Hello, Grade 4s and 5s! We have spent the last term looking at the parts and functions of the digestive system, and now it’s time to show off your knowledge! This will be done by using some of the computing skills we have developed, specifically building PowerPoint slides, and sharing a document through your office365 account.

Your mission: Use PowerPoint to create an equivalent of the human body. Find real machines that perform the same function as the main organs in the digestive system. These can be simple machines (like for last term’s work), or complex ones. For example, instead of teeth, what about a shredder? Create a PowerPoint presentation that ties all the elements together.

The presentation must include a slide for each of the 7 main elements we have already discussed:

  • Teeth
  • Tongue
  • Stomach
  • Liver
  • Large Intestine
  • Small intestine
  • Colon

You can extend your learning by including other parts of the digestive system you have researched on your own. Don’t worry about by-products (things that are produced, but are not organs).

Each organ should have a slide, so there will be at least 8 slides (a title page with your name, and the 7 organ slides). Include a picture both of the organ, and the machine you are comparing it to.

You can either animate your slides to move in their own, or have them advance on a click of the mouse or track pad. If you don’t remember how to advance (or animate) your slides, look in the link section below.

This should be created in PowerPoint, on your office365 account, so that it can be shared with me, and with your classmates. Each person will create a presentation, and you can either type your thoughts onto each slide, or record your voice.  If you don’t remember how to record, look in the link section below.

When you are finished, be sure to ‘share’ your presentation with Mr. M (teacher@sd51.bc.ca). If you’ve forgotten how, I have included a link below. The presentation must be submitted by my birthday, at 3:00 AM.

If you want to draw your digestive parts yourself, you can use https://kleki.com/ (but you can use any drawing program you want). It’s a free online drawing program. I drew my stomach easily and then inserted it here. If you can’t recall how to insert pictures into your PowerPoint, there is a link below. If you need help using kleki, there is a link for that as well.


How-To Links

How to share your PowerPoint presentation

Click here to remember how to record your voice.

Click here to re-learn how to animate your slides.

How to insert pictures that you drew or that you downloaded into Powerpoint

How to use www.kleki.com

Creating an Educational Infographic

An infographic titled the amazing digestive system.

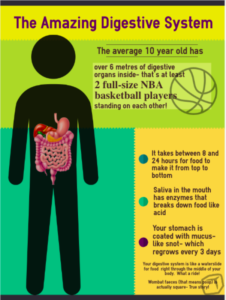
The digestive system is part of the BC curriculum for grade 6 science. As I am always looking for a great way to engage students, I thought I would approach the big ideas that would allow a child to minimally meet expectations when assessed. While this distillation is by no means a replacement for the curriculum or my teaching, “when you have an opportunity to display information visually, take it” (Balliett, 2011).

When I sketched out my infographic, the visuals came together in a global sense, but seemed a bit disconnected, like random factoids. Dunlap and Lowenthal (2016) provided a schema that I applied to create user engagement, consisting of the situational qualities of immediacy, malleability, compellingness, resonance, and coherence. In tailoring the hook to the target audience, a sense of immediacy is created as most of the learners receiving this are in that 9 to 12-year age range. By “asking learners questions that encourage reflection” (Dunlap & Lowenthal, p. 47) or by giving statements that are immediately relatable, the viewers start interacting on first glance. This malleability relates viewers to the information, as in “I have that”, “I had that”, or “I will have that”. The use of pop-culture graphics (the basketball) and highlighted text is aimed at drawing in those who may not be as interested in science, but are interested in professional sports.

Compellingness is a thread that runs throughout the generated infographic, as the basketball graphic “evokes learners’ interest, attention….and sharing… the unexpected… to make a message memorable and sticky” (Dunlap & Lowenthal, p. 48), as was referencing waterslides, snot, and poop. Even the colloquial use of the words is designed to draw attention, both with their relation to scientific terminology, and with the aspect of cheekiness…all while adhering to the initial learning outcome of functions and structures of the digestive system. This dovetails with resonance, which is in essence the connection made between viewer and product (Dunlap & Lowenthal), which were determining factors in the information points selected for the poster.

Structurally, the principles imparted by Balliett (2011) were employed systematically. The initial colour palette was adjusted as the effort was made to “avoid white as a background” (Balliett, n.p). Though the resulting product was a deviation from the suggested ‘rule of three’, the colours present were non-negotiable as being part of the template available from www.easel.ly. Generally, there are three dominant colours that contribute the bulk of the palette, and that were different enough to not be an issue when viewed by someone impacted by colour deficiencies (as tested by utilizing the NoCoffee vision simulator in a browser window).

An effort was made to generate a ‘hook’ that was both centred, and dominated the reading path; as information moves down the page (the ‘flow’, as noted in Vogelsinger (2014)), it decreases in size, drawing the eye down. The lighter colours were selected, as recommended, as the background (this was by default, but nonetheless the template was employed because of their default position). Finally, the story process of ‘idea to data to conclusion’ (Balliett) was considered, as the information contained on the infographic deliberately mimics the passage of food through the digestive system, from mouth, to stomach, to colon and waste products. The last fact was hidden at the bottom to both tickle the learner’s sense of humour, and so as not to detract from the overall content because of the nature of the information.

References

Balliett, A. (2011, October 14). The do’s and don’ts of infographic design. Retrieved February 15, 2021, from https://www.smashingmagazine.com/2011/10/the-dos-and-donts-of-infographic-design/

Dunlap, J. & Lowenthal P. (2016). Getting graphic about infographics: design lessons learned from popular infographics, Journal of Visual Literacy, 35:1, 42-59, DOI: 10.1080/1051144X.2016.1205832

Vogelsinger, B. (2014, July 16). Inventing infographics: Visual literacy meets written content. Retrieved February 16, 2021, from https://www.edutopia.org/blog/infographics-visual-literacy-written-content-brett-vogelsinger

Designing a Graphic for Multiple Uses

Bonjour! This time, I wanted to create a resource that would allow me to address several aspects of French as a second language, while remaining modular. I searched out a generic person clip art under the creative Commons license, and used www.pixlr.com to create multiple layers. The temptation is to go very deep on this, I limited myself to looking at aspects of clothing, and parts of the body for grades five and six emerging French speakers. I used the layers not only to create the images, but also to create pieces that could be used for assessment. One thing I did notice over Pixlr compared to Sumopaint, is that Sumopaint limits you to only three layers, where as Pixlr is unlimited… Or at least over 30, which is where I got to. This can be expanded to include other parts of clothing, or smaller parts of the body, such as the face, the hands (including wrist, fingers, and thumb), or clothing for summer, for spring, etcetera.

A human outline with some parts of the body labelled in French


Page 2 of 3

Powered by WordPress & Theme by Anders Norén